I knew immediately that I wanted to use Silverlight for the user interface for my new WearMyBracket.com website. I wanted a simple, slick UI that would be straight to the point, but still leave folks a little impressed. And I felt that I had just enough UI skills to get this done.
I decided on a "flip" effect to take users through a simple order process. As the user proceeded though my order process, I would flip their canvas over for each step. This provided me an opportunity to save their progress to a database on each transition. As far as I know, there are two good ways to do this in Silverlight: an ADO.NET Data Service or a WCF Service. Either of these can run in your web application hosting your Silverlight application.
I started down the path of adding an ADO.NET Data Service to my web application. I liked the flexibiliy that this presented me. I would not have to write any custom WCF services, as any data operations I wanted to do within my Silverlight application would be possible via the REST-based data service. In addtion, my data model consisted of only a few tables, so I felt things would not be overly complex and were a good candidate for using a data service. Creating the data service is made super simple these days in Visual Studio. After I created my database schema in SQL Server, I went to my web application project, selected "Add New Item", and added an ADO.NET Entity Data Model to my project. After that model is generated from my database schema, I then added the ADO.NET Data Service. A few tweaks in code to relate the two, and I was good to go.
Back in my Silverlight project, I added a service reference to my data service, and started playing around with reading and writing to the data service. I quickly saw that this was not going to be quite as easy as I thought. Because of some of the relationships in my schema, and the way the data service needs to be tracking objects, I would have to make multiple calls to the data service from my Silverlight client in order to do some of my operations. And I also realized that maybe my scenario isn't quite right for a ADO.NET Data Service anyway. After all, my simple application would only need a couple of WCF services that could do all my work, providing simple and streamlined calls from my Silverlight app. I went back and removed my data service, added a Silverlight-enabled WCF service and was on my way. Writing the implemenation within my couple WCF services took less than an hour.
ADO.NET Data Services are flexible, in that you do not have to write any custom services for data operations. However, the I think application needs to have the neccessity for that flexibility. I didn't have that neccessity. I only had one client calling application. My data operations were few, and were not going to change. In my case, writing a couple simple WCF services was the way to go.
Monday, March 9, 2009

Monday, February 23, 2009
WearMyBracket.com
If you know me, then you probably have participated in, or at least about http://www.finalforman.net. The site started out as a way to expand a college March Madness pool back in 2001. Today it is a fun way to keep in touch with a lot of people, and enjoy the month of March.
After getting denied for tickets for the opening rounds in Boise this year, a large group of us decided to head to Las Vegas instead. Blessing in disguise, maybe? While musing about the fun we will have, an idea emerged about wearing our picks on a t-shirt. People seemed to like the idea. So I am now introducing....WearMyBracket.com. Anyone can purchase one of our custom designed shirts. I'll give a shout out to Jake, for his help on the shirt and graphics, and Hans, for their help on getting this off the ground. Place your orders!
With two sites to manage during the month of March, I am going to be a busy man. I am already working on a few improvements to FinalForman.net for this year.
Stay tuned for another post, where I will discuss some of the technical choices I made for this simple site.
After getting denied for tickets for the opening rounds in Boise this year, a large group of us decided to head to Las Vegas instead. Blessing in disguise, maybe? While musing about the fun we will have, an idea emerged about wearing our picks on a t-shirt. People seemed to like the idea. So I am now introducing....WearMyBracket.com. Anyone can purchase one of our custom designed shirts. I'll give a shout out to Jake, for his help on the shirt and graphics, and Hans, for their help on getting this off the ground. Place your orders!
With two sites to manage during the month of March, I am going to be a busy man. I am already working on a few improvements to FinalForman.net for this year.
Stay tuned for another post, where I will discuss some of the technical choices I made for this simple site.
Thursday, February 19, 2009
I'm back!
It has been a long time since my last post. There are a variety of reasons for this. Some of those are good, like the following:
- Spending lots of time with my one-year old.
- Being healthier and more active.
- Pursuing other hobbies in my free time, such as music.
- Found other outlets for communication, such as Facebook.
But all of those doesn't mean I can find time to share a post or two. After all, I am still not a 5:01 developer. So I am back, with some motivation from Greg. Stay tuned for my February post, coming soon...
Friday, April 18, 2008
Silverlight 2: Communicating Between Controls
In an attempt to keep pace with the one a week challenge, here is another post! Does two in one week make up for none in the last?
I have been working on my first production Silverlight application, using Silverlight 2 Beta 1. I have been playing around with how best to structure the site, with maintainability in mind. As a result, I have several user controls that encapsulate specific pieces of functionality. I am treating the Page.xaml that is loaded when my site loads conceptually as my "Master Page", containing different user controls, etc. All in all, I am pretty satisfied.
I came across the need for a user control to communicate with another user control. I started down the route of raising an event and registering handlers. Problem is that my first user control is contained in another user control, and I didn't want to add events and handlers to both user controls to propagate all the way up to my parent page.
I wrote a quick extension method that uses Generics that solves my problem. You can use it to retrieve a specific ancestor of an element... quite useful.

Here is how I called it within my user control...

In unit testing, I saw a variety of StackPanels, Grids, and UserControls on the way to my desired Page. Its important to note that if you have a reference to a Control, its .Parent property will usually give you a container such as a Grid, Canvas, or StackPanel. If you need an "Grandparent" or "Great Grandparent", this extension works well.
I have been working on my first production Silverlight application, using Silverlight 2 Beta 1. I have been playing around with how best to structure the site, with maintainability in mind. As a result, I have several user controls that encapsulate specific pieces of functionality. I am treating the Page.xaml that is loaded when my site loads conceptually as my "Master Page", containing different user controls, etc. All in all, I am pretty satisfied.
I came across the need for a user control to communicate with another user control. I started down the route of raising an event and registering handlers. Problem is that my first user control is contained in another user control, and I didn't want to add events and handlers to both user controls to propagate all the way up to my parent page.
I wrote a quick extension method that uses Generics that solves my problem. You can use it to retrieve a specific ancestor of an element... quite useful.

Here is how I called it within my user control...

In unit testing, I saw a variety of StackPanels, Grids, and UserControls on the way to my desired Page. Its important to note that if you have a reference to a Control, its .Parent property will usually give you a container such as a Grid, Canvas, or StackPanel. If you need an "Grandparent" or "Great Grandparent", this extension works well.
Thursday, April 17, 2008
Managing Environment-Specific Settings In Your Projects
Having an automated build and deployment process is a key and sometimes overlooked component to building software. Part of that process is implementing a mechanism that will manage the changes to environment specific settings that need to be applied to your configuration files when deploying to a specific environment. And if your current mechanism is using notepad to edit your web.config/app.config once your code is deployed....please continue reading :-).
A few months ago, I was turned on to the Enterprise Library Configuration Tool, a new component introduced in Microsoft's Enterprise Library. David Hayden has a good post about how to use this tool. Patterns and Practices explains it here. It addresses this very issue, and provides a user interface to view your settings and apply environmental-specific overrides. I started using this tool, and found that I enjoyed using that UI because I could easily see all the values for a setting across my environments.
I was able to automate the merging of the delta files created by the configuration tool into my build process with a executable provided by EntLib, called MergeConfiguration. I updated my MSBuild project file, TFSBuild.proj, with a target to run this executable after my code was dropped.
The downfall to this method was a limitation I discovered in the Configuration Tool. The settings I was allowed to manage and override were limited to Enterprise Library configuration sections, connection strings, and application settings. I could not change values of settings in sections such as System.Web and System.Net. Hmmm. My honeymoon phase with this tool was officially over.
Another solution to this problem that I like is a solution that Scott Hanselman talks about here. It is pretty simple and here are the steps...
So...I have been using a hybrid approach that addresses these issues for me...
There are definitely other ways to solve this problem. If you have other good solutions, I would love to hear about them....
A few months ago, I was turned on to the Enterprise Library Configuration Tool, a new component introduced in Microsoft's Enterprise Library. David Hayden has a good post about how to use this tool. Patterns and Practices explains it here. It addresses this very issue, and provides a user interface to view your settings and apply environmental-specific overrides. I started using this tool, and found that I enjoyed using that UI because I could easily see all the values for a setting across my environments.
I was able to automate the merging of the delta files created by the configuration tool into my build process with a executable provided by EntLib, called MergeConfiguration. I updated my MSBuild project file, TFSBuild.proj, with a target to run this executable after my code was dropped.
The downfall to this method was a limitation I discovered in the Configuration Tool. The settings I was allowed to manage and override were limited to Enterprise Library configuration sections, connection strings, and application settings. I could not change values of settings in sections such as System.Web and System.Net. Hmmm. My honeymoon phase with this tool was officially over.
Another solution to this problem that I like is a solution that Scott Hanselman talks about here. It is pretty simple and here are the steps...
- Create a new configuration in Visual Studio for each of your environments, such as Staging, Production, etc. You can model each one after the existing Release configuration for starters.
- Create a separate configuration file (i.e. web.config) for each of your environments. So you would end up having web.config.staging, web.config.production, etc.
- Create a Pre-Build Event that swaps the environmental-specific web.config for the existing one based upon the configuration that is being built. You can get a version that does this in Scott's post.
So...I have been using a hybrid approach that addresses these issues for me...
- I create a separate configuration file for my different environments (web.config.staging, etc).
- I add a target to my MSBuild project file (TFSBuild.proj when using TFS) to copy the correct configuration file to the root of my application after it is built. This way, if I have to copy multiple files for multiple configurations, all of the statements are right here.
- (Optional) I modify the properties on the configuration files in the root of my projects to set their Build Action to "None". This means that they will not be included in the build. I like the settings in those files to be local development settings, and know that they will not be replicated to other environments. So what is deployed is either the correct environment-specific config copied in Step 2, or none at all.
There are definitely other ways to solve this problem. If you have other good solutions, I would love to hear about them....
Tuesday, April 1, 2008
TFS Blog Series: Overview (Part 1)
Welcome to the first post of the TFS Blog Series! Greg Martin, my friend and Slalom Consulting collegue, and I will be doing a series of posts about Visual Studio Team System, focused around Team Foundation Server. We will cover a wide range of topics, and hope to give you an in depth look at some of the key features. This series will mostly be from a developer point of view. The majority of the content of the series will apply across both the 2005 and 2008 versions of Team System.
This first post will be an overview. I hope to explain a bit about the what and the why with TFS. The where, when, and how are probably mixed in there somewhere as well.
What is Team System?
Visual Studio Team System is an integrated Application Life-cycle Management (ALM) solution. There are several products designed for individuals serving different roles on a project, from Architects to Developers to Testers.
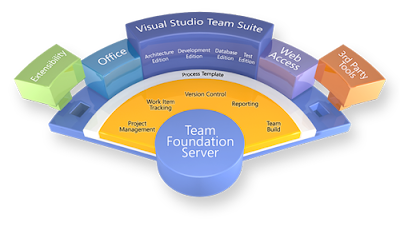
Team System centers around Team Foundation Server (TFS). TFS is the collaboration server, the "hub" of the system, and integrates all of the supporting products. It stores information about a project and provides project-related services, both figuratively and literally. The services that TFS provides for a project include:
Why should you use it?
To me, here are some of the key reasons for why you would want to use TFS on a project.
What do I need to get started?
The first thing you will need is to identify a Team Foundation Server instance to use. Your company may already have an instance ready for you to use. If you are going to be responsible for installing an instance yourself, check out some TFS server planning. If you don't have an instace at your disposal, and you don't want to install/maintain one, you aren't totally out of luck. There are TFS hosting providers starting to pop up as well. Check out TeamDevCentral.
The next step is to install Team Explorer ( 2005 version 2008 version ). Team Explorer will allow you to manage the projects and project components of a TFS instance from within Visual Studio. You may be surpised to know that you do not need a specific Team Edition of Visual Studio to install Team Explorer and use TFS. You can actually install Team Explorer without having Visual Studio installed at all. Team Explorer will install the shell itself. If your TFS instance does not have TFS Web Access configured, Team Explorer will be the primary mode of interaction with your team project.
Here is a example of what the Team Explorer window looks like in the IDE:
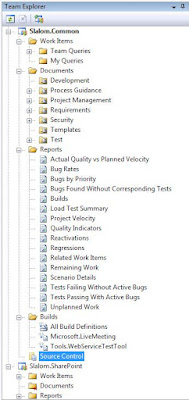
You can see the different areas of Work Items, Documents, Reports, Builds, and Source Control are all nicely viewable in the Visual Studio IDE. One of the nicest things about TFS is its integration within the IDE.
Summary
If you aren't using TFS, check it out. That's it. I hope you will continue to follow this blog series. There will be some great posts on some specific topics in the near future.
Here are some additonal TFS / Team System resources:
This first post will be an overview. I hope to explain a bit about the what and the why with TFS. The where, when, and how are probably mixed in there somewhere as well.
What is Team System?
Visual Studio Team System is an integrated Application Life-cycle Management (ALM) solution. There are several products designed for individuals serving different roles on a project, from Architects to Developers to Testers.
Team System centers around Team Foundation Server (TFS). TFS is the collaboration server, the "hub" of the system, and integrates all of the supporting products. It stores information about a project and provides project-related services, both figuratively and literally. The services that TFS provides for a project include:
- Work Item Tracking
- Source/Version Control
- Reporting (via SQL Server Reporting Services)
- Build Services (via Team Build)
- Project Portal (via SharePoint)
So what are those other products that make up Team System besides Team Foundation Server? They are the different Team Editions of Visual Studio:
- Visual Studio Team System Architecture Edition
- Visual Studio Team System Development Edition
- Visual Studio Team System Database Edition
- Visual Studio Team System Test Edition
- Visual Studio Team System Test Load Agent
- Visual Studio Team Edition Team Suite (a.k.a all of the above)
It is important to note that you DO NOT need one of these Team Edtions to use TFS. The regular Visual Studio versions (Standard and Professional) can be used. However, you will miss out on some of the features in the specific editions designed for Team System.
Here is a nice picture provided by Microsoft that visually depicts Team System:Why should you use it?
To me, here are some of the key reasons for why you would want to use TFS on a project.
- Promoting Best Practices
Using TFS promotes you to follow best practices, plain and simple. Because you are provided with just about all the pieces you need to full manage a team project, you would have to make a conscience choice to NOT use features, and not follow best practices. It is entirely opposite when you are not using a product like TFS. Then, you have to make the effort to incorporate best practices into your project. With TFS, its all right there for you to use. And you will. - Providing One Common Tool Suite
Having a common tool suite is very nice. I personally love not having to leave the Visual Studio IDE to check/modify work items, find documents, view reports, use source control, and run builds. In the past, think about all of the different third party solutions that would come into play. I am sure you probably have worked on a project with VSS or Perforce, NANT, Cruise Control, NUnit, some custom deployment solution, and some sort of Work Item tracking tool. Throwing out all of those in exchange for just ONE product is great. Less time spent getting all of these to play together, and more time spent on the actual delivery of the project. - What You Get Out of the Box
I love to do a presentation where I show what I get with TFS when starting a new project. I say.... "Lets see what I get in 10 minutes of work". After the 10 minutes I have a new project created, complete with different security groups set up. I have initial Iteration 0 work items assigned to project team members in the Work Item Tracking system. I have some initial documents uploaded into the SharePoint portal for our project. I have reports showing the upcoming work, even displaying in that portal. I have source control set up and my initial code solution imported. And I have an automated, continuous integration build established for that code solution, with the first build complete. IN TEN MINUTES!!! Granted I am talking very fast and I know my way around. But you can see just how much you have at your disposal when starting a new project. No time is wasted getting all of these pieces set up individually.
What do I need to get started?
The first thing you will need is to identify a Team Foundation Server instance to use. Your company may already have an instance ready for you to use. If you are going to be responsible for installing an instance yourself, check out some TFS server planning. If you don't have an instace at your disposal, and you don't want to install/maintain one, you aren't totally out of luck. There are TFS hosting providers starting to pop up as well. Check out TeamDevCentral.
The next step is to install Team Explorer ( 2005 version 2008 version ). Team Explorer will allow you to manage the projects and project components of a TFS instance from within Visual Studio. You may be surpised to know that you do not need a specific Team Edition of Visual Studio to install Team Explorer and use TFS. You can actually install Team Explorer without having Visual Studio installed at all. Team Explorer will install the shell itself. If your TFS instance does not have TFS Web Access configured, Team Explorer will be the primary mode of interaction with your team project.
Here is a example of what the Team Explorer window looks like in the IDE:

You can see the different areas of Work Items, Documents, Reports, Builds, and Source Control are all nicely viewable in the Visual Studio IDE. One of the nicest things about TFS is its integration within the IDE.
Summary
If you aren't using TFS, check it out. That's it. I hope you will continue to follow this blog series. There will be some great posts on some specific topics in the near future.
Here are some additonal TFS / Team System resources:
Monday, March 24, 2008
Team System Code Name Rosario
The development community has been hit with an onslaught of releases in the past several months. First came the much anticipated Visual Studio 2008, and its various editions. Then you add in TFS 2008, Team Explorer 2008, the .NET 3.5 Framework, ASP.NET MVC, Silverlight 2 Beta, and the list goes on. It is truly an exciting time.
But something kind of slipped under the radar, at least in my opinion. Microsoft released a CTP of Visual Studio Team System Code Name "Rosario", the version of Team System that follows 2008. (Wait, isn't it still early 2008?)
Here are some of the highlights that will be included in "Rosario", either in the current CTP or future releases:
But something kind of slipped under the radar, at least in my opinion. Microsoft released a CTP of Visual Studio Team System Code Name "Rosario", the version of Team System that follows 2008. (Wait, isn't it still early 2008?)
Here are some of the highlights that will be included in "Rosario", either in the current CTP or future releases:
- Historical Debugging - support to go back to a specific point in time.
- Rule Sets - configure your projects to use various categorized sets of Code Analysis rules in your solution.
- Just My Code Profiler - support to exclude external framework and component calls from performance tests.
- Version History - ability to track changes across branches and merges.
- Add to Source Control - ability to drag/drop and add from outside mapped folders.
- Additional Metric and Dashboards - increasing project visibility.
- Build/Deploy Setup - integrated support to build setup packages.
- And a ton more...
Subscribe to:
Posts (Atom)