Friday, April 18, 2008

Silverlight 2: Communicating Between Controls

In an attempt to keep pace with the one a week challenge, here is another post! Does two in one week make up for none in the last?

I have been working on my first production Silverlight application, using Silverlight 2 Beta 1. I have been playing around with how best to structure the site, with maintainability in mind. As a result, I have several user controls that encapsulate specific pieces of functionality. I am treating the Page.xaml that is loaded when my site loads conceptually as my "Master Page", containing different user controls, etc. All in all, I am pretty satisfied.

I came across the need for a user control to communicate with another user control. I started down the route of raising an event and registering handlers. Problem is that my first user control is contained in another user control, and I didn't want to add events and handlers to both user controls to propagate all the way up to my parent page.

I wrote a quick extension method that uses Generics that solves my problem. You can use it to retrieve a specific ancestor of an element... quite useful.


Here is how I called it within my user control...


In unit testing, I saw a variety of StackPanels, Grids, and UserControls on the way to my desired Page. Its important to note that if you have a reference to a Control, its .Parent property will usually give you a container such as a Grid, Canvas, or StackPanel. If you need an "Grandparent" or "Great Grandparent", this extension works well.

Thursday, April 17, 2008

Managing Environment-Specific Settings In Your Projects

Having an automated build and deployment process is a key and sometimes overlooked component to building software. Part of that process is implementing a mechanism that will manage the changes to environment specific settings that need to be applied to your configuration files when deploying to a specific environment. And if your current mechanism is using notepad to edit your web.config/app.config once your code is deployed....please continue reading :-).

A few months ago, I was turned on to the Enterprise Library Configuration Tool, a new component introduced in Microsoft's Enterprise Library. David Hayden has a good post about how to use this tool. Patterns and Practices explains it here. It addresses this very issue, and provides a user interface to view your settings and apply environmental-specific overrides. I started using this tool, and found that I enjoyed using that UI because I could easily see all the values for a setting across my environments.

I was able to automate the merging of the delta files created by the configuration tool into my build process with a executable provided by EntLib, called MergeConfiguration. I updated my MSBuild project file, TFSBuild.proj, with a target to run this executable after my code was dropped.

The downfall to this method was a limitation I discovered in the Configuration Tool. The settings I was allowed to manage and override were limited to Enterprise Library configuration sections, connection strings, and application settings. I could not change values of settings in sections such as System.Web and System.Net. Hmmm. My honeymoon phase with this tool was officially over.

Another solution to this problem that I like is a solution that Scott Hanselman talks about here. It is pretty simple and here are the steps...
  1. Create a new configuration in Visual Studio for each of your environments, such as Staging, Production, etc. You can model each one after the existing Release configuration for starters.
  2. Create a separate configuration file (i.e. web.config) for each of your environments. So you would end up having web.config.staging, web.config.production, etc.
  3. Create a Pre-Build Event that swaps the environmental-specific web.config for the existing one based upon the configuration that is being built. You can get a version that does this in Scott's post.
After trying this method, I found a couple of things I did not like. First of all, I didn't like having to create environment-specific configurations within Visual Studio. In some solutions, I have multiple configurations for code that will be deployed to different locations. I don't like idea of duplicating configurations for all those existing configurations, that all are essentially the same. Secondly, in larger solutions, you will have to copy that "pre-build" event into each project that has a configuration file. This spreads this very similar logic across my solution in different places I need to keep track of.

So...I have been using a hybrid approach that addresses these issues for me...
  1. I create a separate configuration file for my different environments (web.config.staging, etc).
  2. I add a target to my MSBuild project file (TFSBuild.proj when using TFS) to copy the correct configuration file to the root of my application after it is built. This way, if I have to copy multiple files for multiple configurations, all of the statements are right here.
  3. (Optional) I modify the properties on the configuration files in the root of my projects to set their Build Action to "None". This means that they will not be included in the build. I like the settings in those files to be local development settings, and know that they will not be replicated to other environments. So what is deployed is either the correct environment-specific config copied in Step 2, or none at all.
The downside with this method (and the one Scott describes) is that you have multiple web.config files to manage. Some people really do not like this. I don't mind it. If you make use of the fact that you can split out configuration sections that do not change across environments into separate includes, you can eliminate a lot of the redundancy. To me, you are either going to have multiple config files, or multiple delta files. It probably just depends on preference.

There are definitely other ways to solve this problem. If you have other good solutions, I would love to hear about them....

Tuesday, April 1, 2008

TFS Blog Series: Overview (Part 1)

Welcome to the first post of the TFS Blog Series! Greg Martin, my friend and Slalom Consulting collegue, and I will be doing a series of posts about Visual Studio Team System, focused around Team Foundation Server. We will cover a wide range of topics, and hope to give you an in depth look at some of the key features. This series will mostly be from a developer point of view. The majority of the content of the series will apply across both the 2005 and 2008 versions of Team System.

This first post will be an overview. I hope to explain a bit about the what and the why with TFS. The where, when, and how are probably mixed in there somewhere as well.

What is Team System?

Visual Studio Team System is an integrated Application Life-cycle Management (ALM) solution. There are several products designed for individuals serving different roles on a project, from Architects to Developers to Testers.

Team System centers around 
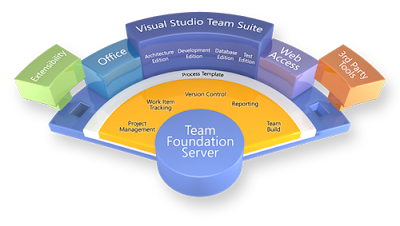
Team Foundation Server (TFS). TFS is the collaboration server, the "hub" of the system, and integrates all of the supporting products. It stores information about a project and provides project-related services, both figuratively and literally. The services that TFS provides for a project include:

  • Work Item Tracking
  • Source/Version Control
  • Reporting (via SQL Server Reporting Services)
  • Build Services (via Team Build)
  • Project Portal (via SharePoint)

So what are those other products that make up Team System besides Team Foundation Server? They are the different Team Editions of Visual Studio:

It is important to note that you DO NOT need one of these Team Edtions to use TFS. The regular Visual Studio versions (Standard and Professional) can be used. However, you will miss out on some of the features in the specific editions designed for Team System.

Here is a nice picture provided by Microsoft that visually depicts Team System:


Why should you use it?

To me, here are some of the key reasons for why you would want to use TFS on a project.

  • Promoting Best Practices
    Using TFS promotes you to follow best practices, plain and simple. Because you are provided with just about all the pieces you need to full manage a team project, you would have to make a conscience choice to NOT use features, and not follow best practices. It is entirely opposite when you are not using a product like TFS. Then, you have to make the effort to incorporate best practices into your project. With TFS, its all right there for you to use. And you will.

  • Providing One Common Tool Suite
    Having a common tool suite is very nice. I personally love not having to leave the Visual Studio IDE to check/modify work items, find documents, view reports, use source control, and run builds. In the past, think about all of the different third party solutions that would come into play. I am sure you probably have worked on a project with VSS or Perforce, NANT, Cruise Control, NUnit, some custom deployment solution, and some sort of Work Item tracking tool. Throwing out all of those in exchange for just ONE product is great. Less time spent getting all of these to play together, and more time spent on the actual delivery of the project.
  • What You Get Out of the Box
    I love to do a presentation where I show what I get with TFS when starting a new project. I say.... "Lets see what I get in 10 minutes of work". After the 10 minutes I have a new project created, complete with different security groups set up. I have initial Iteration 0 work items assigned to project team members in the Work Item Tracking system. I have some initial documents uploaded into the SharePoint portal for our project. I have reports showing the upcoming work, even displaying in that portal. I have source control set up and my initial code solution imported. And I have an automated, continuous integration build established for that code solution, with the first build complete. IN TEN MINUTES!!! Granted I am talking very fast and I know my way around. But you can see just how much you have at your disposal when starting a new project. No time is wasted getting all of these pieces set up individually.
So on what type of a project would you use TFS? To me, it is for everyone on any software development project, regardless of project size or team size. I have worked on software projects by myself, and I still use TFS. It's great for giving me a source control and a place to plan out and prioritize my work. And if my team of one were to grow, even to two, the project would be all ready for a collaborative work effort. In teams of larger size, it is a no-brainer.

What do I need to get started?

The first thing you will need is to identify a Team Foundation Server instance to use. Your company may already have an instance ready for you to use. If you are going to be responsible for installing an instance yourself, check out some TFS server planning. If you don't have an instace at your disposal, and you don't want to install/maintain one, you aren't totally out of luck. There are TFS hosting providers starting to pop up as well. Check out TeamDevCentral.

The next step is to install Team Explorer ( 2005 version 2008 version ). Team Explorer will allow you to manage the projects and project components of a TFS instance from within Visual Studio. You may be surpised to know that you do not need a specific Team Edition of Visual Studio to install Team Explorer and use TFS. You can actually install Team Explorer without having Visual Studio installed at all. Team Explorer will install the shell itself. If your TFS instance does not have TFS Web Access configured, Team Explorer will be the primary mode of interaction with your team project.


Here is a example of what the Team Explorer window looks like in the IDE:


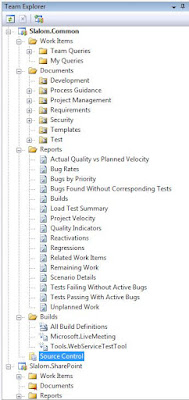
You can see the different areas of Work Items, Documents, Reports, Builds, and Source Control are all nicely viewable in the Visual Studio IDE. One of the nicest things about TFS is its integration within the IDE.

Summary

If you aren't using TFS, check it out. That's it. I hope you will continue to follow this blog series. There will be some great posts on some specific topics in the near future.

Here are some additonal TFS / Team System resources:

Monday, March 24, 2008

Team System Code Name Rosario

The development community has been hit with an onslaught of releases in the past several months. First came the much anticipated Visual Studio 2008, and its various editions. Then you add in TFS 2008, Team Explorer 2008, the .NET 3.5 Framework, ASP.NET MVC, Silverlight 2 Beta, and the list goes on. It is truly an exciting time.

But something kind of slipped under the radar, at least in my opinion. Microsoft released a CTP of Visual Studio Team System Code Name "Rosario", the version of Team System that follows 2008. (Wait, isn't it still early 2008?)

Here are some of the highlights that will be included in "Rosario", either in the current CTP or future releases:
  • Historical Debugging - support to go back to a specific point in time.
  • Rule Sets - configure your projects to use various categorized sets of Code Analysis rules in your solution.
  • Just My Code Profiler - support to exclude external framework and component calls from performance tests.
  • Version History - ability to track changes across branches and merges.
  • Add to Source Control - ability to drag/drop and add from outside mapped folders.
  • Additional Metric and Dashboards - increasing project visibility.
  • Build/Deploy Setup - integrated support to build setup packages.
  • And a ton more...
Here are some helpful links regarding "Rosario":

Wednesday, March 19, 2008

Mounting ISO Images on Windows Vista

This post will be entirely useless to you, until you encounter this same problem and remember that you read this.

I was recently building out a new developer image for Vista. I have all of my ISO files for installing large programs such as Visual Studio Editions, SQL Server, and the like, stored on a handy external hard drive. One of my first tasks is to install an application that allows me to mount images. I have been using Virtual CloneDrive lately. I have really liked this tool, especially since it allows you to just double-click an ISO file and off it goes.

I used Virtual CloneDrive to mount a couple files and those installations went fine, including VS 2008 . I then proceeded to an ISO for VS 2005 Team Edition for Software Developers. I have used this ISO many a time before, not on Vista however. However, this time the setup could not access certain files. After some digging, I found a forum post about similar issues, and another post on a possible solution. It seems that Virtual CloneDrive is not completely compatible with Vista, at least for some ISOs. The solution was to uninstall, and use Daemon Tools instead. I tried, and sure enough, the installation worked fine with Daemon Tools.

Monday, March 10, 2008

Silverlight 2

I recently attended Mix '08, Microsoft's conference for discussing new web technologies. The buzz was definately around Silverlight 2, the latest release of Microsoft's answer to Adobe Flash. Silverlight 2 Beta 1 is now available, and in my opinion, will become the norm for consumer-facing rich internet applications.

Silverlight 1.0, and subsequent 1.1, was released in 2007, and included support for mainly media-driven content sites. Version 2.0 introduces a wide variety of built-in controls and layout options that will bring the simplicity and familiarity of .NET Web Development to a rich client-side interface.

Here are a variety of resources I have assembled around Silverlight 2.0, from installation guides, to tutorials, examples, and sites.

Tools/Installs:

Presentations/Tutorials:

Sites/Examples:

  • Deep Zoom is a feature in Silverlight 2.0. Hard Rock's new memorabelia site showcases it. Scott Hansleman has a good post about this site and the technology in general.
  • Video featuring some of the previous and new Silverlight sites.
  • PhotoZoom is a great site featuring Deep Zoom. You can upload photos, and it will stitch them together into an album and you can Deep Zoom away.
  • A plethora of great examples are in the showcase at Microsoft's Silverlight site.

Sunday, March 9, 2008

FinalForman.NET

For those that know me, you know where my brain is this time of year. There is something always special about the tournament. Even when I haven't been paying close attention this season, February turns to March and all of a sudden I care again.

And that brings me to......http://www.finalforman.net. Trying to do my part in getting the word out. Check it out, let me know what you think.

Sunday, January 13, 2008

Enum To Collection: Make Binding Easy

I prefer storing domain data for applications in an Enum, when that data seldom/rarely changes. In doing so, I find that I need to display this data in the form of a DropDownList in the UI. Through a generic "Enum To Collection" method, and the use of ObjectDataSources, this task is very easy.

Here is the generic static method to turn an Enum into a Collection:


public static Collection<KeyValuePair<string, int>> ToCollection<T>()


{


Collection<KeyValuePair<string, int>> collection = new Collection<KeyValuePair<string, int>>();


Array values = Enum.GetValues(typeof (T));


foreach (int value in values)


{


collection.Add(new KeyValuePair<string, int>(Enum.GetName(typeof (T), value), value));


}


return collection;


}

I then define a static method in my business class decorated with the DataObject attribute:


[DataObjectMethod(DataObjectMethodType.Select)]


public static Collection<KeyValuePair<string, int>> GetDays()


{


return EnumHelper.ToCollection<Days>();


}
Then, just drop a DropDownList control onto your page. Use the Configure Data Source wizard to select your static method you just defined:


And that's it. Check it out:


Note: I like to set "AppendDataBoundItems" to true, and add my "-Select-" value on the page. This is nice because I don't have to deal with that logic in my business tier.

Hope you like it and happy binding.

Friday, January 4, 2008

Easy trick to decreasing your page size!

While working on a project with Than Nap, a fellow Slalom consultant, I picked up a simple trick to decreasing your page size.

If you have worked with MasterPages in ASP.NET 2.0, you have no doubt been looking at the source of a page, and seen something like the following....


The naming convention of controls following the hierarchy of pages in which the control is nested. When the ID of a masterpage is not explicitly set, it defaults to ctl00. When you add a new MasterPage to a project/website, you get default content like the following...


If you just start going from here, you may be making a mistake. The names you give (or don't give) your MasterPage and ContentPlaceHolders show up twice per control. And you might be appalled if you look at the source for a gridview/detailsview.

Here's the tip:

  1. Name your contentplaceholders with as short of name as possible. I use "c" for a main content area, "t" for a title, and so on.

  2. Add the following piece of code to code behind of your MasterPage.


The same example I started with (btnSave) would now look like this in source...


In larger applications, with complex web forms, this little trick may get you a 10% decrease in page size alone!